

Hey there! for those of you who are wondering this is my very first blog post
Also all photos are my own original work, and I work hard to take these so it would be appreciated if you don’t use these for non personal purposes without credit. If you do use my photos please link my website and contact me before hand and also do not copy and paste my content somewhere else, however you can leave a link to my blog.
Calligraphy is definitely something that’s worth learning. It can add so much more to your cards, your bullet journal, your sketchbook, your notes basically anything that you have to write will look that much better.
Traditional vs modern
OK so traditional calligraphy looks pretty different from modern calligraphy and there’s actually multiple types of traditional calligraphy like Spencerian, Italic and copperplate etc. Traditional calligraphy has very specific and structural strokes that make up the letters.
Traditional scripts are done with certain tools and very precise measurements of heights and angles. Whereas modern calligraphy allows more freedom and you can’t really give it an exact definition because there are so many unique styles and techniques. Which is why in this article I am going to give you the basics for learning calligraphy and a general rule you should follow.
Tools
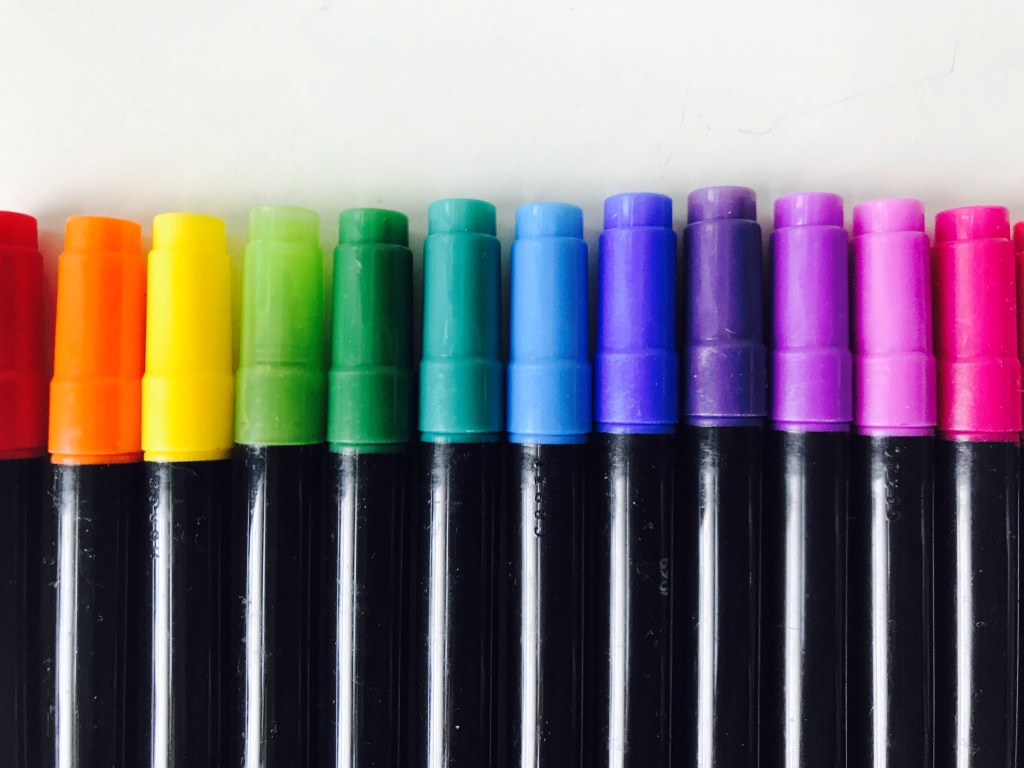
So I’m not gonna talk too much about tools because if you’re a beginner I wouldn’t recommend buying fancy nibs and brush pen till you’ve had enough practice with something a little more basic. So, what if I told you that all you need to make awesome calligraphy or just to learn calligraphy is a Crayola marker? Yep that’s it! Crayola markers are actually perfect for this because you can draw thin lines and broad lines with the same marker.

Crayola broad line marker
Crayola supertips
https://shop.crayola.com/color-and-draw/washable-super-tips-markers-50-count-5850500024.html
Just to sum things up you don’t need to buy fancy pens or even brush pens to make beautiful calligraphy.
P.S. However if you like calligraphy and would like to step it up a notch and get fancy, then I will have a blog post soon on popular and good quality tools that you should think about buying, but for beginners I would recommend starting with a basic marker.
Up and down strokes
The strokes make up all the letters in calligraphy. With up and down strokes there is a general rule you should follow.
Do you notice something similar about the strokes on these letters?

Well if you look closely every stroke that goes downwards is thicker, likewise the strokes going upwards are thinner. When doing calligraphy, this is something to remember.
Warm up drills
Now before you attempt calligraphy you have to warm up your hands and become more familiar with up and down strokes. Now I know what you’re thinking, when will we get to the actual calligraphy?! But trust me, it’s worth the wait to learn about the structure and warm up. It will make learning calligraphy a lot easier.
Anyhoo, I have a free printable below with a few warm up drills to help you out.

How to print
If you are currently on a mobile device save this image to your camera roll, and then send it to your computer (or email it to yourself and log into your email on your computer) and print it out.
If you are on a desktop device, then open this image in a new tab and print it out from there!

How to hold
So holding your pencil, or marker is kind of self explanatory for me, but I’m going to try and explain it as best as possible. Also, I don’t hold my pencil the right way, so yeah. Basically different people like to hold the pen in different ways, but that’s not the important part. It’s the angle you hold it at.

Holding it at an angle will make a difference when it comes to the contrast between the upstrokes and the down strokes. Also holding the pen upright could damage your pen.

It will make it easier to get the broad and the thin side of the marker.
A few tips before you start
1. Spacing
Spacing is something that just makes writing or really anything more visually appealing. To prevent what’s shown below on the left side, I find that pausing between strokes helps to prevent having the letters too close together or too far apart.

It’s just the little things like this that make all the difference.
2. Remember the up and down strokes!
If you just remember to make the strokes going up thin and the strokes going down thicker it will be a lot easier. One of the biggest mistakes I see with my friends and family, is that they make the up strokes thick and the down strokes thin, so just remember!
3. If you are still having trouble
If you are still struggling then I would recommend holding off on adding cursive, or fancy fonts and starting with normal writing.

Then when you are comfortable with that, add in the font or cursive aspect.
Well that was my blogpost on calligraphy for beginners, I hope you enjoyed and you were able to learn calligraphy! Feel free to leave a comment down below, also you do not need to put in your name, website or email to leave a comment, it is optional. And remember, practice makes perfect! I hope to see you next week!


Hi wondering when next blog post is…. waiting for greatness!!
LikeLiked by 1 person
Coming to you soon!
LikeLike
Hi. Just want to say that I was wondering if you could post a blog about cooking and some good recipes. I personally love baking and wanted to know if this blog could help..
LikeLiked by 1 person
Hi! I love baking too, especially with family, but I haven’t been finding and making the time to bake or cook. I do miss making food blogposts tho and if I’m in the mood for a food post, you’ll see one soon! Thanks for commenting 💜
LikeLike
My daughter, Sarah, was wondering if you could do a Part 2 of your easy, free room decor. She loves your posts and gets so excited whenever you reply to our comments. Sarah was also wondering if you could do some type of day in the life of your routine and she was inspired to clean her room, finally.
LikeLiked by 1 person
I’m so glad she likes my posts! And I’m so glad she was inspired cleaned her room! And I’ll definitely try to start on a day in the life routine and a part 2 of the easy, free room decor. Thank you so much for commenting, this makes me so happy!
LikeLike
Like we promised we stayed to see your next post. It was amazing and 2 months ago my daughters birthday occurred and she had been begging for one of those instax cameras. She tried all you hacks and she said her favorite was definitely that cool ombre filter and the computer background with the sanitizer. Still on the lookout for your next post.
LikeLiked by 1 person
Thank you, I’m glad she liked them. Tell your daughter that I wished her a very happy belated birthday! 🥳 😊
LikeLike
Hi this blog is awesome can’t wait to see more and I was wondering if you could a topic on organizing
LikeLiked by 1 person
Thank you, I’m glad you liked it! I actually have that on my idea board right now, I guess I’m moving it to the top of the list!
LikeLike
I was wondering if you could do some painting crafts for my room…
LikeLiked by 1 person
Of course!
LikeLike
Loved it…. so crafty and fun because we are quarintined. We were wondering if you could post a yarn craft
LikeLiked by 1 person
Thank you, I will definitely post a yarn craft soon. Thank you for requesting that!
LikeLike
My daughter loved this post and we will definitely keep following. She is 10 years old and wanted to learn this for a card she was making. We loved it.
LikeLiked by 1 person
Aww thank you so much, I’m sure she did a fabtastic job! Look out for my next post!
LikeLike
Omg I love art and this is so inspiring.
LikeLiked by 1 person
Aww thank you so much!
LikeLike
Love this page so much.
LikeLiked by 1 person
Thank you! 😊
LikeLike
Hi I just want to say that I love this and it is so good 😊
LikeLiked by 1 person
Thank you!
LikeLike
Never done calligraphy in my life but this blog is making me to give it a try. Good detailed instruction to get anyone started.
Thank you for posting this.
LikeLiked by 1 person
Well I hope you can successfully learn calligraphy, and remember practice makes perfect, so if you don’t get it right the first time, just practice. Thank you so much!
LikeLike
As a beginner, I can say that this the best breakdown of Calligraphy. Most elaborate and descriptive#Top Notch!!!
LikeLiked by 1 person
Thank you so much Smi! That means a lot!
LikeLike